
 TUTORIAL
Open the My Account orders page on a stock WooCommerce store and every order says one word. Processing. The customer has no idea whether that means “we have your money”, “we are packing it” or “it left yesterday”. So they email you, and you type out the answer that the page could have shown.
An order status timeline replaces that one word with a sequence of stages and the dates they happened on. It is not a hard thing to build. It is, however, built on a fact about WooCommerce that trips up almost every first attempt.
WooCommerce does not store per-status transition history.
Look at the date properties on WC_Order and there are exactly four:
date_createddate_modifieddate_paiddate_completedThat is the complete set. There is no date_processing, no record of when an order went on hold and came back, no timestamp for a custom status your fulfilment plugin added. date_modified is the last time anything changed, which is not the same thing at all.
So a timeline showing “Packed — 14 August, 3:20pm” cannot be derived from an existing order. Something has to have been recording transitions as they happened.
Every status change writes an order note, and notes have timestamps. It looks like the history is right there, and every developer who hits this problem tries it first.
It is the wrong data source, for reasons that only show up in production:
Order notes are a human audit trail. Treat them as one.
The correct approach, and a short one. WooCommerce fires woocommerce_order_status_changed with the old status, the new status and the order object. Record what you need, on the order, through the CRUD layer:
add_action(
    'woocommerce_order_status_changed',
    function ( $order_id, $from, $to, $order ) {
        $log = $order->get_meta( '_my_status_log' );
        $log = is_array( $log ) ? $log : array();

        // Forward-only: keep the first time a status was reached.
        if ( isset( $log[ $to ] ) ) {
            return;
        }

        $log[ $to ] = time();

        $order->update_meta_data( '_my_status_log', $log );
        $order->save();
    },
    10,
    4
);
Three things about that snippet are deliberate.
It uses update_meta_data() and save(), not update_post_meta(). On a store with High-Performance Order Storage enabled, orders do not live in wp_posts and wp_postmeta. Code that writes post meta directly appears to work on a legacy store and silently writes nothing useful on an HPOS one.
It records forward only. An order that goes processing → on-hold → processing should not overwrite the original processing timestamp, or the timeline will claim the order was confirmed later than it was.
It is bounded. One entry per status, and a store has perhaps ten statuses. This data is only ever read alongside its own order, so denormalising it into order meta is the right call — no join, no extra query per row on the orders list.
Same mechanism, plus the parts that take the actual time: mapping statuses to stages, rendering into a theme you did not write, the empty states, and the orders that predate installation. If you want to see what the finished shape looks like before deciding to build it, the comparison of what the tracking plugins already display is a reasonable starting point — several of them ship a timeline widget already.
This is the part that decides whether the timeline reads as useful or as broken, and it is a content problem more than a code one.
Your statuses are operational: processing means something specific to your warehouse. The stages a customer reads are a different vocabulary: Placed, Confirmed, Packed, Shipped, Out for delivery, Delivered. A mapping screen connects the two, one row per status you actually use.
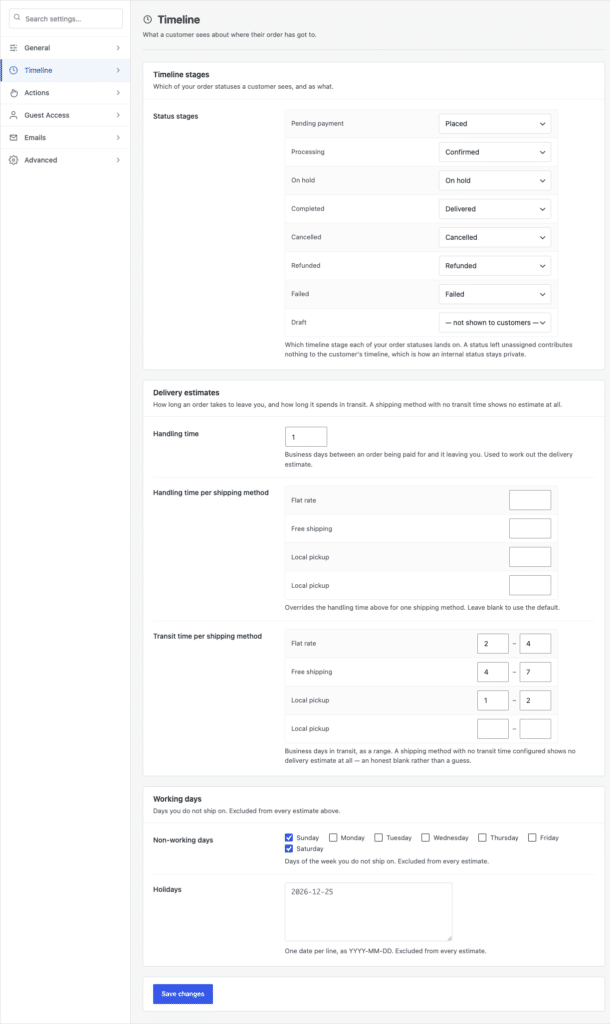
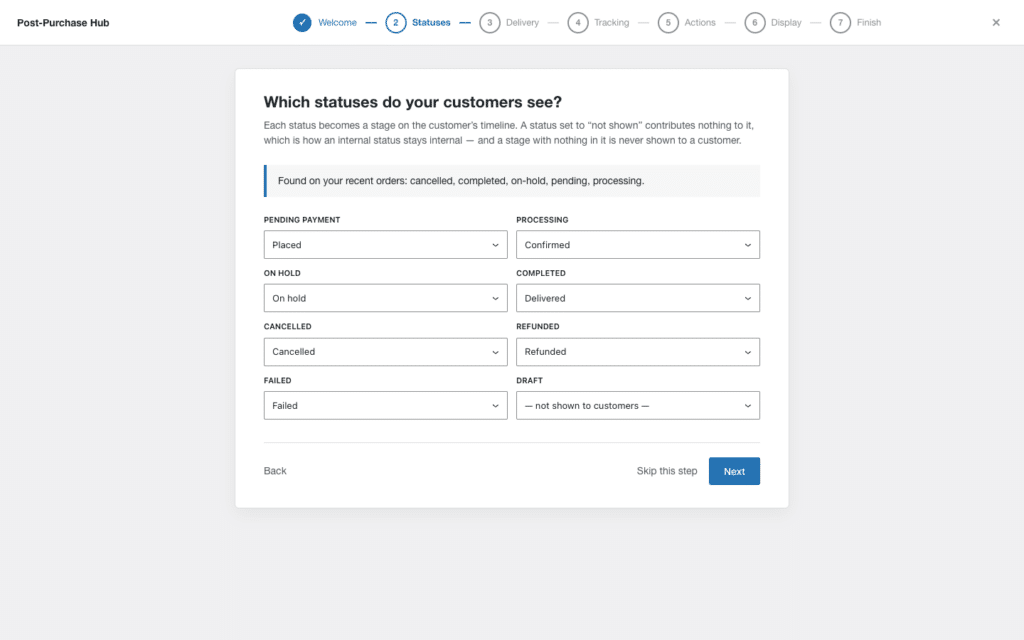
Two rules make this work.
Internal statuses stay internal. If you have a awaiting-supplier status, the customer does not need a stage for it. Map it to nothing and it disappears from their view while remaining fully visible to you.
Do not show stages you never reach. This is the big one.
Plenty of stores only ever use two statuses in practice: an order arrives as processing, and when it ships somebody marks it completed. That is a perfectly good workflow.
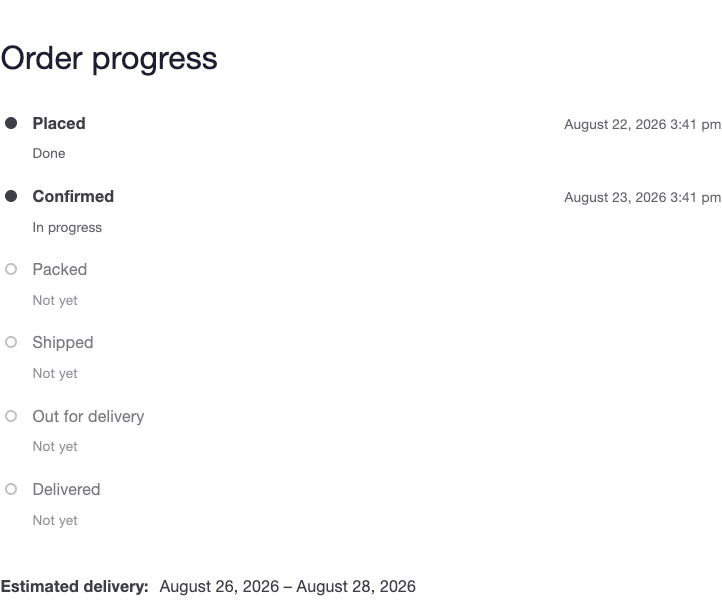
Now put a six-stage timeline on it. The customer sees Placed and Confirmed filled in, then Packed, Shipped and Out for delivery permanently empty, then Delivered. Three stages that will never light up, sitting on the page for the entire life of the order.
The customer does not read that as “this store has a simple workflow”. They read it as “something is stuck”, and they email you — which is the thing the timeline was supposed to prevent. A timeline with permanently empty stages generates more support email than no timeline at all.
So derive the stage set from the statuses your store has actually used, not from an idealised fulfilment process. If you only use two, show two.
A timeline is a line until an order leaves it. Cancelled, refunded and failed are not stages on the way to Delivered — they are terminal, and they need to render as an obvious branch rather than as a stage that has gone quiet.
The failure to avoid: a cancelled order displaying a timeline stopped at Confirmed with four grey stages below it, which looks exactly like an order that is merely slow. Show the terminal state prominently, keep the stages that did happen, and drop the ones that now never will.
The day you start recording transitions, every existing order has no history. A customer with a six-month-old order opens it and finds an empty timeline.
You have three honest options, and one dishonest one.
date_created, date_paid and date_completed. That is enough for Placed, Confirmed and Delivered on most orders. Fill those three and leave the rest blank.If you are backfilling a large store, do it from WP-CLI rather than in a request. Iterating tens of thousands of orders through the CRUD layer is exactly the job that times out on a web request and works fine from the command line.
Two places, and they want different things.
On the single order page, the full timeline. woocommerce_order_details_after_order_table puts it directly under the items, which is where people look.
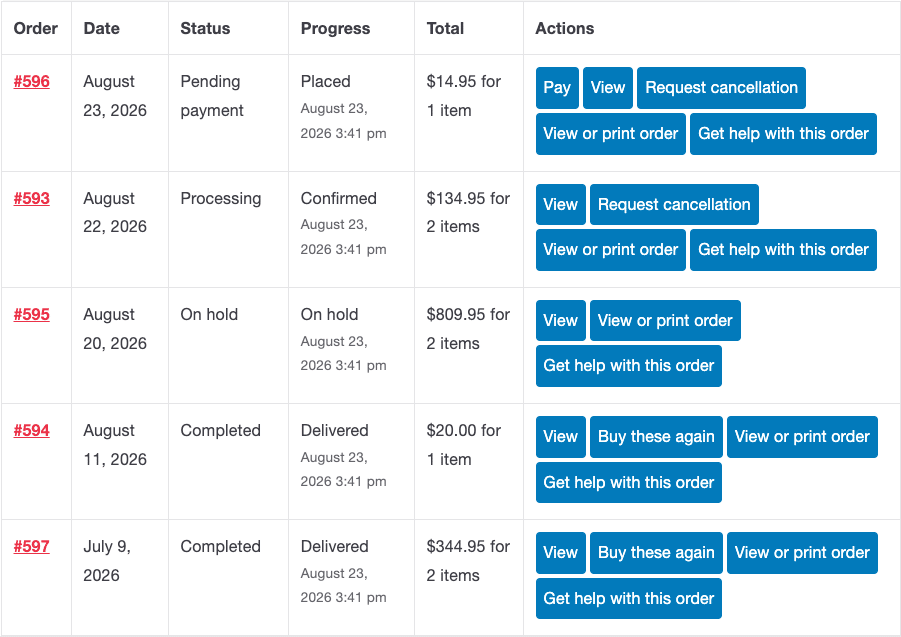
On the orders list, one line per order — the current stage and its date. A customer with four open orders should be able to see all four states without opening anything. That means an extra column, which means woocommerce_account_orders_columns and the matching woocommerce_my_account_my_orders_column_{$column_id} action.
Resist the temptation to build a separate “order tracking” page. A customer who has an orders list and a tracking page now has two places to check and no idea which is authoritative. Enhance the page they already visit — the guide to customising that page without breaking your theme covers how to do that through hooks rather than template overrides.
A timeline is only as truthful as the status changes behind it. If your team marks orders completed in a batch every Friday, the timeline will show every order in that batch being delivered on Friday afternoon, which is not what happened.
That is not a plugin problem and no plugin can fix it. Before you install anything, look at when your statuses actually change relative to when the physical events happen. If the gap is large, close that first — a timeline built on batched status updates is a more precise-looking version of the same vague answer.