 TUTORIALS
You’ve got your course lessons written and published. Now you want them to unlock on a schedule — not all at once, not manually, automatically. This is the complete walkthrough.
Everything below assumes you’re using WordPress with the block editor and the Content Time Lock plugin. No LMS. No membership plugin. No developer.
Before touching any settings, have these three things ready:
Your lesson posts or pages. Each lesson should already be a published WordPress post or page. If they’re still in draft, publish them first — the time lock will hide the content regardless of post status, so publishing doesn’t mean students can read them yet.
Your unlock schedule. Decide the exact dates and times each lesson unlocks, or the number of days after registration if you’re running an evergreen course. Write it down. You’ll be entering these one by one.
A test user account. Create a second WordPress user with a Subscriber role. You’ll use this to preview the locked experience as a real student.
Go to Plugins → Add New and search for “Content Time Lock.” Install and activate the plugin. It adds two things to your WordPress admin: a settings screen under Time Locker and a new panel in the block editor sidebar on every post and page.

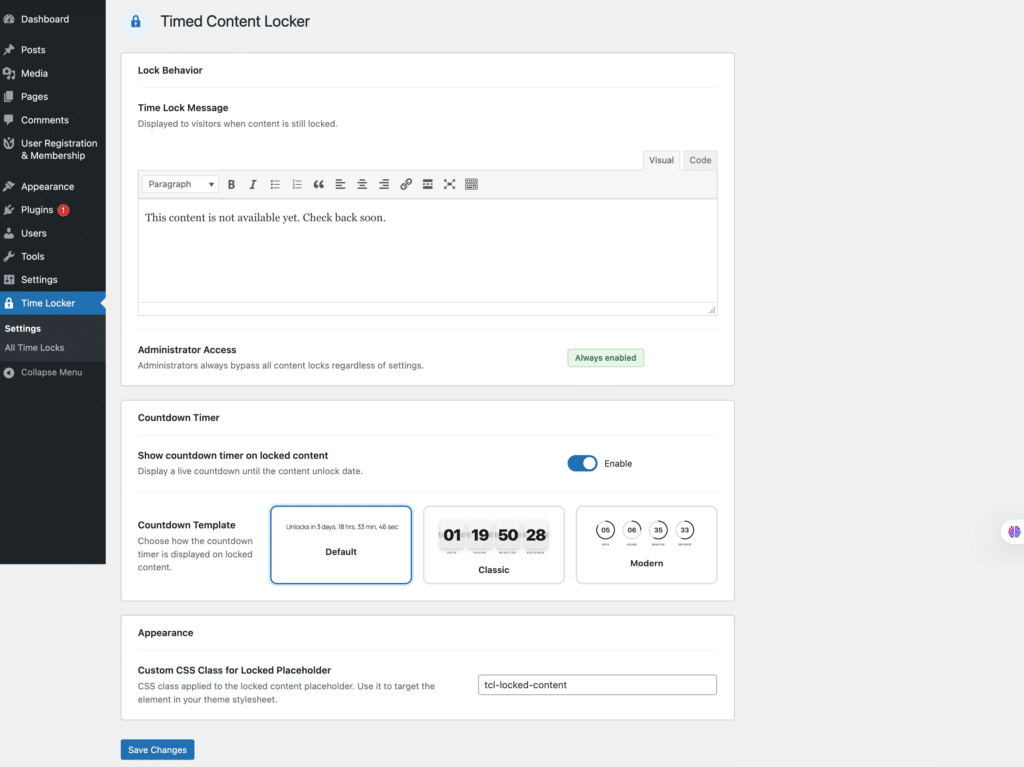
Go to Time Locker → Settings. These are the defaults that apply to every locked lesson unless you override them at the post level.
Locked message. Write the message students see when a lesson is locked. Keep it warm and specific: “This lesson isn’t available yet. It unlocks on [date] — sit tight.” You can use generic text here and override it per lesson if needed.
Countdown timer. Toggle this on. The countdown does real work — students who see a timer counting down to a specific unlock time are far more likely to return than students who see a static message.
Countdown template. Choose from Default (plain text), Classic (flip-clock style), or Modern (circular dials). Pick whichever fits your site design.
CSS class. Leave this as the default tcl-locked-content unless you plan to add custom styles.
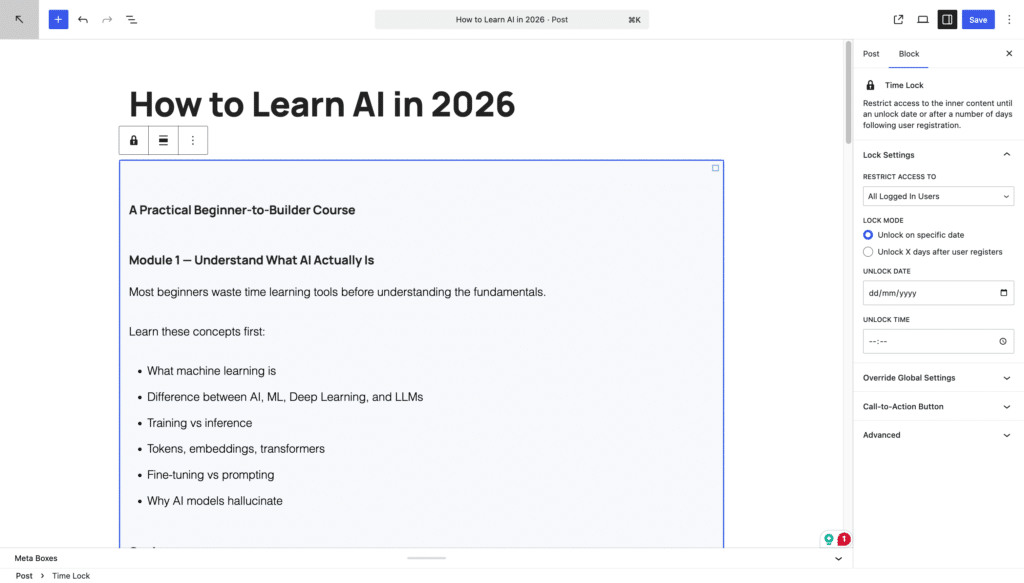
Open the first lesson you want to lock. In the block editor, look at the right-hand sidebar. You’ll see a panel called Time Lock Content below the standard post settings.
Enable the time lock. Check the “Enable Time Lock” toggle. The panel expands to show the full settings.
Choose who is restricted. Your options are: All Users, Specific Roles, or Guest Users only. For most course setups where students are logged in, choose “All Users” if you want even logged-in students locked out until the date, or “Guest Users” if only non-logged-in visitors should be blocked.
Set the unlock date and time. Pick the exact date and time this lesson becomes visible. The plugin uses your site’s timezone as set in Settings → General.
Choose your unlock mode. If you’re running a cohort course with a fixed launch date, use “Fixed date.” If you’re running an evergreen self-paced course, switch to “Days after registration” and enter a number — for example, 3 means this lesson unlocks 3 days after the student’s WordPress registration date.
Save the post.
Open each remaining lesson and repeat Step 3. The only thing that changes each time is the unlock date or the number of days after registration.
A quick reference for a typical six-lesson sequence using fixed dates:
For registration-relative mode, the same sequence looks like: 0, 3, 7, 14, 21, 28 — days after each student’s individual registration date.

Each lesson can have its own locked message instead of the global default. Open a lesson, scroll to the Time Lock Content panel, and enable Override Global Settings. You’ll see fields for a custom message and the option to add a call-to-action button.
Use this to make the locked screen actively useful:
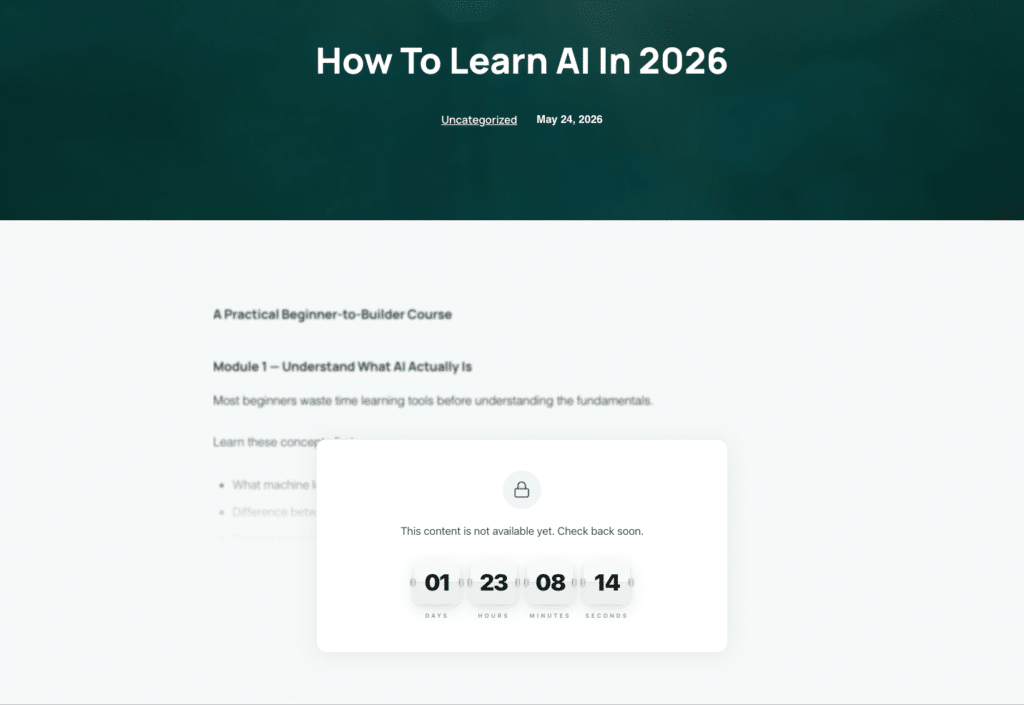
This step is not optional. Log out of WordPress and visit each lesson URL in incognito. You should see the locked message and countdown on every lesson except Lesson 1.
Then log in as your test Subscriber account and visit the same URLs. Depending on your restriction setting, either the content shows or the lock applies to logged-in users too. Confirm it matches your intent.
Finally, go to Time Locker → All Time Locks for a central overview of every locked post, its unlock date, and its current Locked/Unlocked status. Use this as your audit view before launch.
There’s no separate “go live” button for the locks. Everything is already active. The moment a lesson’s unlock date passes, the content becomes visible automatically — no action required on your end.
Your drip course is running. Install Content Time Lock from the WordPress plugin directory and follow these steps to have your first lesson locked before the end of the day.